
Together we will try to put the mutlicolour Hungarian cube to order. The method we are going to use here is, in broad outline, similar to Singmaster's method, with a few improvements taken from methods of his enlightened professional colleagues. The general rule will be getting slices or, in other words, individual floors to order. The method can be divided into 7 stages + an initial stage. With a little skill, you can put the cube to order in less than five minutes.
The goal is simply to absorb the terminology. We have adopted Singmaster's symbols, which in any case are used by the most cubers. They are practical and their undoubted advantage is the independence of colours. The original cube has standard colours arranged in a specific way, but its varieties often have different colours.
The rule will be marking each surface with a letter which represents its position. Thus we have "f" standing for the front surface, "a" for the back, "h" for the top, "b" for bottom, "g" for left and "d" for right. Thus the position of each part of the cube can be represented by two letters - if it's an edge or with three - if it's a corner. For example, "hf" stands for the edge, which has one side on the surface "h", and the other on the surface "f", "db" is the position of the edge with one side on the surface "d", and the other on "b". According to the same rule, "fhd" stands for the corner with one side on the surfaces "f", "h" and "d" each.
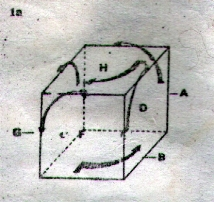
Every rotation of a surface thus can be marked with a capital letter: F for a quarter of a
turn of the "f" surface clockwise, A for a quarter of a turn of the "a" surface clockwise, and so on:
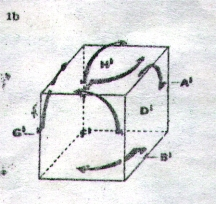
G, D, H and B. The same quarter-turns done
in the opposite direction will be marked using the
same letters only by adding an ' (apostrophe): F', A', G',
D', H', B'. At last, half-turns are
marked by adding the digit 2: for example, F2 means double execution of F. Notice,
that F2 gives the same result as F'2.
Using the same markings, you can write every move as a shorter or longer sequence. For example,
the manoeuvre FDABGH means making a clockwise quarter-turn of the surfaces in this order:
front, right, back, bottom, left and top. We read every manoeuvre form left to right.
It won't be the same if you first do F, then D, that is, FD,
instead of D first, than F, that is,
DF. If you're not convinced - try it. On the other hand, you can always "erase"
a move by doing the
opposite move. The opposite manoeuvre to FDABGH is H'G'B'A'D'F'. Also here,
the order must be
preserved: the "erasing" must be done from the end to the beginning, as we would unpick a row of
eyes badly done on needles. The opposite of FD' is DF', and the opposite
of FG2 is G2F'.
This first stage could also be named "the red cross" or "the green cross": once more we underline that the reasoning is not related to particular colours, but you have to start with some colour. We've chosen white, beacause maybe it is the most conspicouos. The goal of this stage is the correct setting of the 4 white edges, which is easier said than done. Beacause now we are taking care of only one of the surfaces, the number of possible manoeuvres is big. Thus, we won't put the detailed method here. Put the cube, so the white middle is on the top surface.

When you get to the configuration showed on picture 2, you can proceed to the next stage.
We will now complete the white cross by arranging 3 of 4 of the corners with one side white. It is slightly harder than the first stage, beacause each corner has three sides, which must be correctly arranged.
Here's what we'll do:
Have the white surface still in the top position. Find the first corner with a white side, which
is beside the "b" surface. Then, you have two possibilities: either the white side of the corner
is on "b" or not. If it's not there, turn the "b" surface so the side, which is not white and is
not on "b", is on the surface matching its colour. For example, if we're talking about the
white-red-blue corner and the red is
at the bottom, you move the blue to the blue surface. Then you'll notice, that your corner is
in the vertical position to the position it should take. Turn the cube, so the white is on the
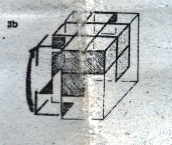
"f" surface. If the position you want to achieve is "hdf" (picture 3a), do FBF'.
If it is "hgf", do F'B'F (picture 3b).

If the white side of the corner is on the "b" surface, begin from bringing this corner, as
previously, to the position opposite in vertical to the correct one. Put the cube, so that it is
the position "hdf", then do FB2F'B', which as result will give us the
situation shown either on picture 3a or 3b, and all we will have to do is FBF' or
F'B'F to put the corner in the right place.
The last possibility: the corner you're on is already at the top, but has incorrect postition or
is badly directed. In such a case, you must lower it using FBF' and deal as previously.
Using this method you can arrange all 4 top corners to have the whole first floor completed, that is, not only the white surface, but the whole "slice". Here, however, we are going to introduce an improvement called the Jullien's stamp (named after its inventor), which consists in temporary not putting the fourth top corner, which allows easy arranging 4 edges of the "belt".
The idea is to use the position opposite in vertical to the yet not-arranged fourth corner as an "elevator" to arrange four edges of the belt, in other words - second floor (the edges, which should take the positions "fd", "fg", "da", "ga").
First, locate these four cubes. Usually, some of them are at the bottom, and some of them are on
the second floor (but maybe badly located). Choose one of the parts lying on the bottom,
supposed you find one. Let's suppose it's green and orange (we use the colours here only for
comfort). One of the sides must lie on the surface "f", "a", "g" or "d". Let's suppose, that's the
orange one: turn the "b" surface, so the orange colour is on the green surface (if green isn't
at the bottom, move it to the orange surface). Turn the cube, so you have the part, which you
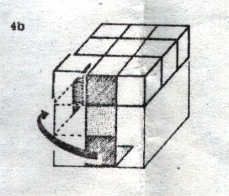
want to arrange, in front of you, and turn the "h" surface, so the "stamp" (the not-arranged
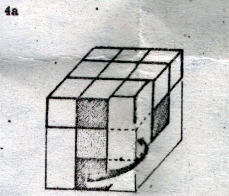
corner) is in vertical above the position you want the part to be. If the part is to be moved right
(picture 4a), do D'BD, if left (picture 4b), do GB'G'.
If the part you want to arrange is already in the belt, but is incorrectly put, turn the cube,
so it's in position "fd", get the stamp over it and lower the part with D'BD. Later,
do as previously.
It should be quite easy to arrange the 4 parts of the "belt". Then you have to arrange the last corner. Turn the "h" surface, so the 3 corners have their correct positions. Many cases are possible here. The best is the one, which has the stamp-corner on its place and correctly directed. In such case, proceed to stage 4.
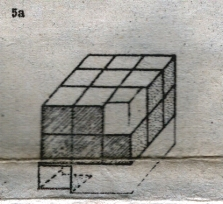
If the corner is at the bottom and the white side is not on surface "b", the situation still isn't
bad. Turn "b", so the white side of the corner is diagonally to the correct position of the corner.
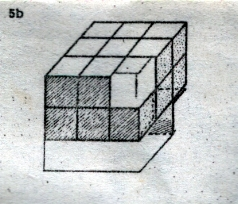
You'll then get picture 5a or 5b. If it's 5a, do D'B2A'B2AD.
If it's 5b, do FB2GB2G'F'.
If the corner is at the bottom with the white side facing down, so it can't be put diagonally,
begin from putting it diagonally to the correct position, turning the cube, so the position is
"hdf". Then do DF'D'F three times: the corner will find its place.
The last instance: the corner is already up, but is badly directed. Do FBF'B'D'B2D,
which will lower the corner, temporarily destroying "fd". Fix it by doing B'FB'F', then deal as
previously (in every manoeuvre keep the stamp-corner in the "hdf" position).
Right now you should have two floors completely arranged. Turn the cube, so the white surface is at the bottom. It will stay like this till the end.
The goal of the stage is putting the four top sides of the edges "hd", "hg", "hf" and "ha"
on the top.
The number of sides, which are already up is in any case even: 0, 2 or 4. If it is 4, proceed to
the next stage, if not, use the following manoeuvre, turning the cube if needed: If "hf" and "ha"
are to be turned up, do AGHG'H'A'. If "hg" and "ha" are to be turned up, do
AHGH'G'A'. Right now,
on the top surface you should have a cross (without the corners), but the 4 top edges
not necessarily are in the correct places.
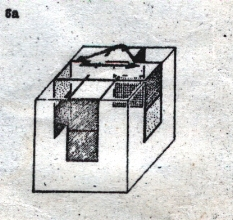
If they are in place - don't do anything. In other case turn the top surface, so one of the
edges is in place, and other three require a circular permutation. Put the right one in front
of you. If the permutation is to be done anti-clockwise, as on picture 6a, do DHD'HDH2D'.
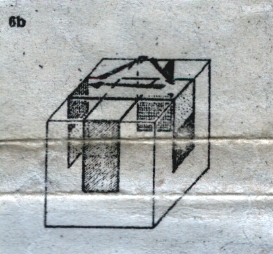
If the permutation is to be done clockwise, as on picture 6b, do the above manoeuvre twice, or
if you wish, do G'H'GH'G'H2G.
If you aren't able to obtain the situation 6a or 6b, it means you have to exchange the edges. In such case, do any of the above manoeuvres once. Turning the "h" surface, you should get one of the necessary configurations.
For now, don't bother about directioning, but about the positions occupied by the 4 top corners.
If they all are in place, proceed to the next stage. In other case either one of them is in place
or none. If one, 3 other should be subject to a circular permutation. Turn the cube, so
the right corner is on position "had". Then do GH'D'HG'H'DH. If it isn't enough, do it again. If
any of the corners isn't in its place, do the above manoeuvre once to achieve one of the above
figures and do as shown. You have now 4 corners correctly put, but maybe they're incorrectly directed.
This stage isn't the hardest, but it requires greatly cold blood, all the harder to keep, as you're almost at the end. Check one more time, if the corners really are incorrectly directed. If it is so, turn the cube, so you have one of the badly arranged corners in "hdf" position.
If the corner on the position "hdf" is to be rotated clockwise, do FBF'B'FBF'B'. If in the opposite
direction, do BFB'F'BFB'F'. In both cases the corners arrange correctly, but the whole rest of
the cube turns into a chaos. Don't bother about it.
Still, not losing sight of the front surface, turn the "h" surface to move the remaining badly directed corner to the "hdf" position. Repeat this manoeuvre, until all four corners are on the right positions and correctly directed. Now all you have to do is to arrange the top surface - and THE END !!!
Singmaster adds an optional extra stage: scream "victory!", uncork a bottle of champagne, send me a cheque... and so on. If you were able to use this method, we congratulate you. Of course, this algorithm isn't one of the most "for the show", but its undoubtful advantage is the ease of notation and remembering particular stages. HAVE FUN!
Here's the last advice: if you've already got familiar with all the secrets of the cube and you're bored with it, do as Rubik - think of a new game.